From a dental lab perspective, 80% of remakes, delays, and communication back and forth are caused by poor scan quality, not material or design issues. In this guide, we will walk through real examples of bad and good digital scans, explain why certain scans create risks during fabrication, and share practical tips to help you submit scans that labs can confidently work with, especially when outsourcing cases for the first time.
1. What Makes a Digital Scan “Bad” for Dental Labs?
A bad digital scan is not always obvious at first glance. In many cases, dentists believe the scan is complete, while technicians struggle to identify margins, contacts, or occlusion accurately. Below are the most common issues labs encounter.
1) Margin Covered by Gum Tissue
One of the most frequent problems is subgingival margins that are not clearly exposed. When the gum tissue covers the margin:
- The technician cannot accurately identify the finish line
- Margin placement becomes a guess rather than a precise decision
- The risk of open margins or overextended crowns increases significantly
Even if the margin exists in the scan data, soft tissue overlap makes it clinically unreliable.
Lab impact: Unclear margins force technicians to rely on experience rather than data, increasing remake risk.
Let’s look at the example. The margin is subgingival. There is blood, and the gum tissue covers the margin. Therefore, the doctor could receive a crown that has open margin or fitting problem, because our lab technicians have to guess where the margins are, but this guess experience COULD be wrong.
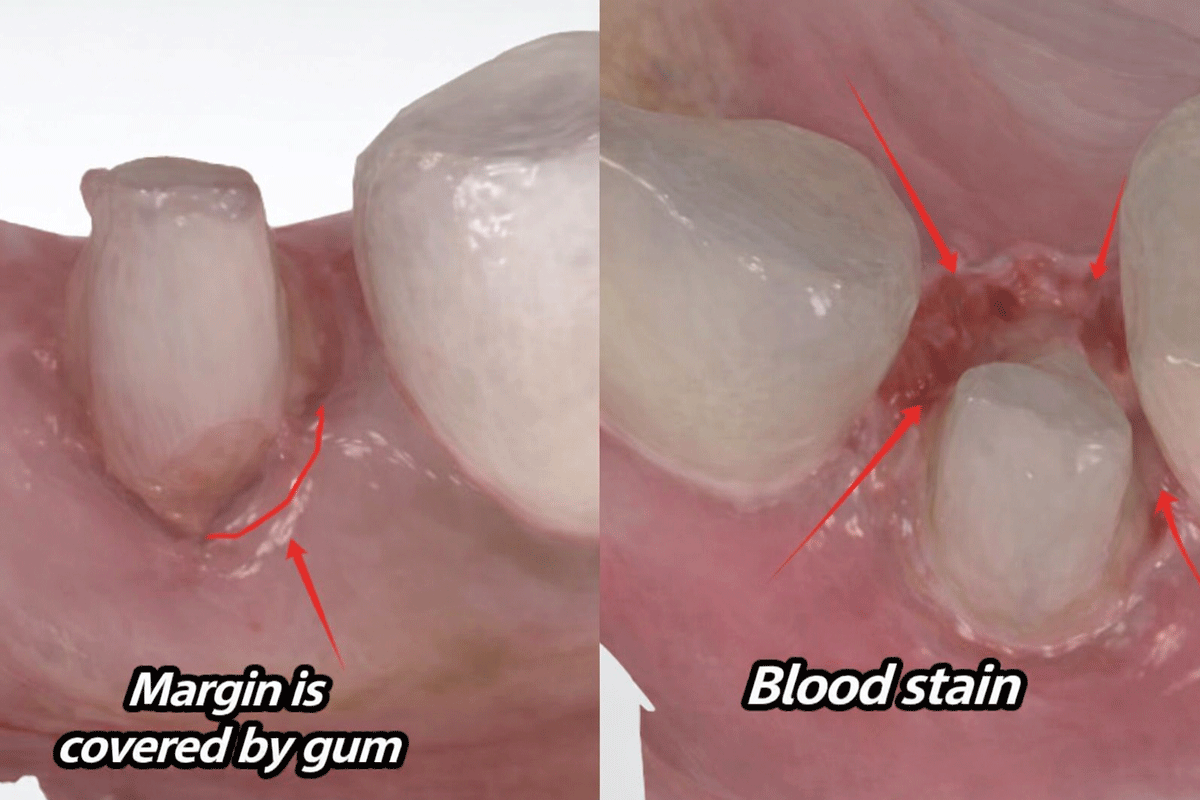
In this case, it seems the margins are clear, but if you look more closely, you will find a zigzag line on the mesial. It is because the mesial margin is covered by flesh (gum tissue). After a thin layer of gum tissue is cleaned with water several times, it becomes transparent. If this transparent gum tissue is attached to the margin, it is hard to find out.
2) Blood, Saliva, and Contamination Around the Margin
Blood stains and saliva are another major issue, especially in subgingival preparations. These contaminants:
- Distort the scanned surface
- Hide fine margin details
- Create artificial edges that confuse CAD software
In some cases, what appears to be a “margin” is actually coagulated blood or saliva residue.
Lab impact: Margins may be detected incorrectly, leading to poor fit or crown overhang.
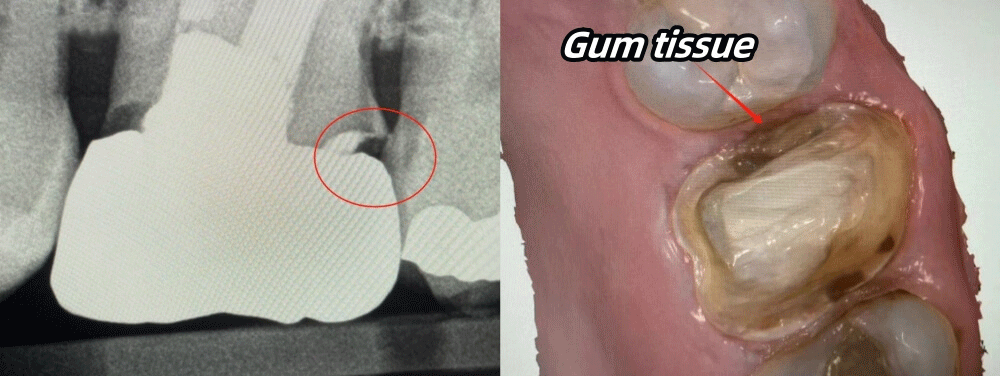
In the left example, the gum tissue is swelling and covering the margin. In the right side example, there is also a lot of blood stain. Those conditions would negatively influence our technicians’ judgment on margins.
3) Inflamed or Swollen Gum Tissue
If the gum tissue is inflamed or swollen during scanning:
- The soft tissue shape is unstable
- The margin position may change after healing
- The final restoration may no longer fit once inflammation subsides
This is especially problematic for crowns with subgingival margins.
Lab impact: Even a well-designed crown may fail clinically due to post-scan tissue changes.
4) Unclear Interproximal Contact Areas
Poor scans often show:
- Missing data between adjacent teeth
- Overlapping surfaces
- Flat or distorted contact zones
Without clear interproximal data, labs cannot properly control contact tightness.
Lab impact: Crowns may arrive with contacts that are too tight or too open, requiring chairside adjustments.
5) Inaccurate Occlusion or Missing Bite Data
Incomplete occlusal scans or inaccurate bite registration lead to:
- Incorrect occlusal clearance
- High spots after cementation
- Increased adjustment time or remakes
Many failures attributed to “lab issues” actually start with occlusal scan errors.
Lab impact: The crown may look perfect digitally, but fail under real occlusal force.
6) Summary
Normally, it is best to prepare teeth above gingival. Of course, we understand that dentists cannot prepare margins above the gum due to some special conditions.
Therefore, if dentists have to prepare teeth subgingival, it is best to use retraction cords, which can help clearly separate gum tissue and tooth structure. Or if you don’t use retraction cords, please at least make sure you have totally cleaned blood and saliva, and no gum tissue is covering the margin.
2. What Does a Good Digital Scan Look Like?
A good digital scan provides clear, stable, and complete information that allows the lab to fabricate restorations confidently and efficiently.
1) Clearly Visible Margins
In high-quality scans:
- Margins are fully exposed
- No soft tissue overlaps the finish line
- The margin path is continuous and easy to trace
This is especially critical for zirconia and ceramic restorations where precision is essential.
Best practice: Proper gingival retraction and tissue management before scanning.
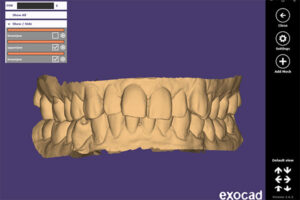
Let’s look at the following example. The margin is above the gum, so the gum tissue is not swelling. We can see that all margins are clear. With this scan, our technicians can easily identify the margins and make crowns with a perfect fit.
![]()
2) Clean Preparation Without Contamination
Good scans show:
- Dry, clean preparation surfaces
- No blood or saliva around margins
- Consistent texture without visual noise
This allows CAD software and technicians to accurately detect margins and surfaces.
3) Stable and Healthy Soft Tissue
When soft tissue is healthy and properly managed:
- The scanned shape remains stable
- The crown margin will match the clinical situation at delivery
- Long-term fit improves
Even subgingival margins can be scanned successfully when tissue is well controlled.
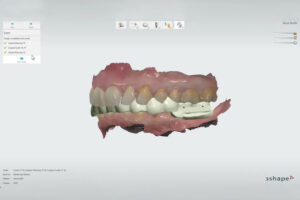
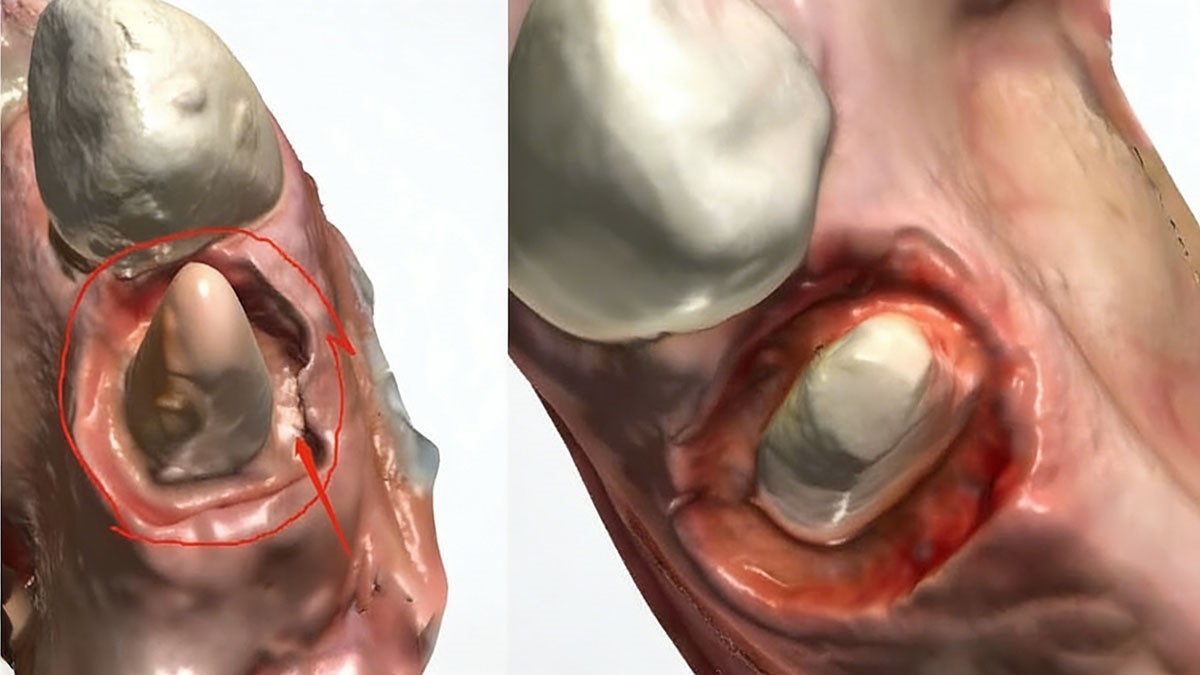
For example, in this scan, the margin is subgingival. Yet, the doctor treated this case pretty well. Even though the gum tissue is swollen, the doctor separated the gum from the tooth structure (no gum covers the margin). Also, she cleaned blood and saliva on the margin area.
![]()
4) Proper Interproximal Contact Space
A reliable scan should clearly show:
- Adjacent tooth contours
- Contact zones and embrasures
- Enough space for proper crown thickness
As a reference:
- Interproximal space is typically around 1.5 to 2.0 mm
- Crown thickness should generally be at least 0.8 to 1.0 mm to avoid fracture
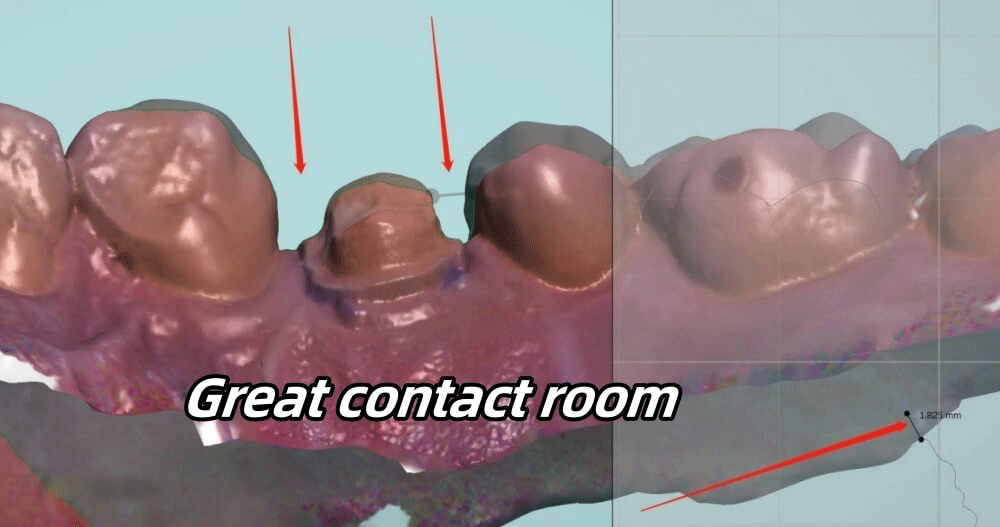
Just like the example, each interproximal space is 1.825mm. Usually, the interproximal space should be between 1~1.5mm, so we can make a crown that is thick enough. Please note that a crown should be about 0.8~1mm thick to avoid breakage. With this interproximal space, dentists can also seat crowns with ease.
5) Accurate Occlusal Clearance and Bite Registration
A good occlusal scan provides:
- Balanced occlusion
- Sufficient clearance, usually around 1.5 to 2.0 mm
- Clear opposing anatomy
With proper occlusal data, labs can design crowns that require minimal or no chairside adjustment.
Let’s look at the example below, the occlusal space is 2.621mm (the occlusal space normally should be between 1.5~2mm). This occlusal clearance is enough for us to make a crown with beautiful details. We can also make the final crown slightly out of occlusion, so the crown will not break easily due to strong biting forces.
![]()
3. Practical Tips to Improve Your Digital Scan Quality
Before submitting cases to a dental lab, especially an outsourcing partner, consider the following checklist:
- Ensure margins are fully exposed before scanning
- Control bleeding and saliva thoroughly
- Avoid scanning inflamed or unstable tissue
- Verify interproximal data completeness
- Double-check occlusal and bite scans
- Review the scan from multiple angles before submission
Spending a few extra minutes at the scanning stage can save days of remakes and communication later.
4. Why Scan Quality Matters Even More When Outsourcing
When working with an external dental lab:
- The technician cannot physically inspect the patient
- All decisions are based entirely on digital data
- Poor scans limit the lab’s ability to compensate
Clear scans reduce:
- Remake rates
- Delivery delays
- Misunderstandings between the clinic and the lab
They also build trust and efficiency in long-term outsourcing relationships.
5. Conclusion
In conclusion, good scans help dentists save time and costs. It will also make patients’ clinic visits easy and quick. If you follow these instructions and check your digital scans carefully before sending them to us, we believe you can greatly decrease the remake rates.