Digital case submission has become the standard in modern dental workflows. Compared to traditional impressions, digital cases allow faster communication, clearer margin visualization, and more predictable fabrication results. When properly organized, digital files significantly improve efficiency for both clinics and laboratories.
In professional dental collaboration, a structured workflow is essential. Clear file organization, complete case information, and proper file transfer methods help reduce unnecessary back and forth communication, avoid production delays, and minimize remake risks.
In your collaboration with Bestodental, you are free to use any method that is most convenient for you to send your STL files. Our team is flexible and will integrate into your existing workflow to ensure smooth and efficient cooperation.
That said, the workflow outlined below is the standardized process developed and refined by Bestodental through long-term practice. It is designed to improve efficiency, prevent avoidable errors, and maintain stable turnaround times.
If you find this approach practical, we encourage you to follow the guide below for more efficient coordination with the Bestodental team.
1. Prepare and Organize Your Case Files
To maximize communication efficiency and reduce unnecessary clarification, Bestodental standardizes digital case submission using three structured components to ensure we receive complete and accurate case information. A complete digital case should include:
- Intraoral scan files
- Prescription form photo
- Case information
For file organization, please follow this structure:
- The intraoral scan files and prescription photo should be placed together inside a subfolder named after the patient.
- The case information for all patients should be compiled into one unified Excel sheet, listing each case clearly.
This structured format is particularly important because the denture production cycle typically runs within one week. During case review or fabrication, our team may occasionally discover that certain clinical details were not fully provided. When a prescription photo is included, our technicians can immediately cross-check the original form to clarify uncertainties without pausing production.
Without this reference, the case may need to be put on hold while waiting for confirmation, especially when time zone differences are involved. If multiple cases require clarification at the same time, these interruptions can accumulate and delay production by several days.
By organizing files in this way, we minimize avoidable pauses and help maintain a stable and predictable turnaround schedule.
Below is the recommended structure and formatting method for organizing each file.
1) Intraoral Scan Files
The intraoral scan files form the technical foundation of the entire restoration process. Accurate and complete STL files allow our design team to evaluate margins, occlusion, and spatial relationships before fabrication begins. Please ensure the following files are included in each patient folder:
Please include:
- Upper arch STL
- Lower arch STL
- Bite scan STL
- Scan body STL (for implant cases, if applicable)
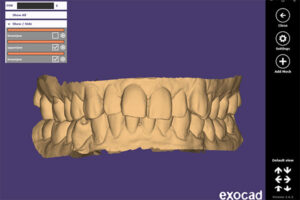
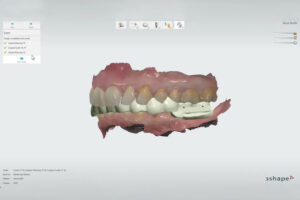
When exporting your scan, please make sure you select the correct export format. As shown in the screenshot below, choose the standard STL export option such as “Color Export – Open Model” or equivalent STL format provided by your system.

Avoid sending temporary session files or proprietary project files that cannot be opened directly by external laboratories. Only finalized STL exports should be submitted to Bestodental.
Selecting the correct export format ensures that our design team can open, review, and begin working on your case immediately. Incorrect export formats may require re-exporting, which can delay case review and production.
2) Prescription Form Photo
When taking a photo of the prescription form, please ensure the image is clear and readable.
If you are a laboratory forwarding the case, we recommend covering or masking any dentist contact details, clinic information, or other sensitive data before taking the photo. This helps protect your client relationships and ensures data confidentiality.
As shown in the example below, our client used a small piece of paper to cover sensitive information before taking the photo. Only clinical information necessary for fabrication should remain visible.

Maintaining proper data protection practices is an important part of professional digital collaboration.
Bestodental fully respects your client ownership and understands the importance of safeguarding your business information.
Please include a clear photo or scanned copy of your prescription form.
This helps our team double-check critical details such as tooth number, restoration type, shade, and special instructions.
3) Case Information (Written Details)
In addition to STL files and prescription photos, please clearly provide:
• Patient name or case ID
• Tooth number(s)
• Restoration type
• Shade
• Material
• Margin design preference
• Occlusal or aesthetic notes
• Special instructions
Even if this information appears on the prescription photo, we recommend including it in written format to avoid misinterpretation and improve processing speed.
2. How to Send STL Files to Bestodental
There are two main ways to send your STL files:
Option 1: Cloud Drive Sharing (Recommended for Larger Files)
This method is stable, secure, and suitable for multiple cases.
A) Using OneDrive
- Step 1: Upload your case folder to your OneDrive.
- Step 2: Right-click the folder and select “Share”.
- Step 3: Choose “Anyone with the link can view”.
- Step 4: Copy the sharing link.
- Step 5: Send the link via email to: [email protected]
In your email, include:
- Case details
- Contact information
- Expected turnaround time
B) Using Google Drive
Step 1: Upload the case folder to Google Drive.
Step 2: Right-click the folder and select “Get link”.
Step 3: Change access to “Anyone with the link”.
Step 4: Make sure permission is set to “Viewer”.
Step 5: Copy the link and email it to: [email protected]
Important:
If access permissions are not properly set, our team will not be able to download your files, which will delay processing.
Option 2: File Transfer Tools (Fast and Simple)
This option works well for single cases or quick transfers.
A) WeTransfer
Step 1
Go to wetransfer.com
Step 2
Upload your STL files and case document.
Step 3
Enter the recipient email:
[email protected]
Step 4
Enter your email address.
Step 5
Add case details in the message field.
Step 6
Send the transfer.
You may also choose the “Get a link” option and email us the download link separately.
Other similar tools you may use:
• Dropbox transfer
• Smash
• SendAnywhere
As long as the file is downloadable and access does not require login approval, it will work.
3. After Sending the Files
Once we receive your STL files:
• Our technical team will review the scan quality
• We will confirm case details
• We will contact you if clarification is needed
• Production will begin after confirmation
If you do not receive confirmation within 24 hours, please follow up with our team to ensure the files were successfully delivered.
4. Best Practice for Smooth Digital Collaboration
- Always verify scan quality before export
- Always include complete case instructions
- Always confirm sharing permissions
- Avoid sending screenshots instead of STL files
Clear files and complete information reduce remake risks, minimize communication cycles, and help maintain predictable turnaround times.
If you are unsure at any step, please contact us before sending the case. Our team is happy to guide you.